


Most D2C brands think they have conversion tracking set up. They have a Meta Pixel firing. Google Tag Manager is installed. Shopify is connected. But when you ask them whether the numbers across platforms actually match, they go quiet.
The truth is, having tracking installed and having tracking set up correctly are two very different things. If your attribution data is wrong, every budget decision you make downstream is wrong too. This guide walks you through exactly how to set up ecommerce conversion tracking across Meta, Google Ads, and Shopify from scratch, in the right order.
Why Most Ecommerce Conversion Tracking Is Broken
Before you touch a single pixel, understand the problem you're solving.
Platforms like Meta and Google use their own tracking cookies to attribute conversions. Both platforms run ads. Both platforms claim credit for the same purchase. The result is that your combined reported ROAS across both channels is almost always higher than what Shopify shows because both platforms are double-counting the same sale.
This isn't a glitch. It's by design. The fix isn't to trust one platform over another - it's to build a tracking setup that reflects what actually happened, then use a neutral layer to reconcile it. If you've ever tried to diagnose the root cause of a ROAS drop and found your platform data and Shopify data pointing in opposite directions, this is why.
Step 1: Set Up Your Shopify Store as the Source of Truth
Everything starts here. Shopify is your neutral data source, it doesn't have a financial incentive to over-report conversions.
Enable Shopify's native analytics first: Go to Settings > Apps and sales channels > Online Store. Make sure your storefront is active and your checkout is tracking orders correctly. Every confirmed purchase should generate an Order Confirmation page, this is where your conversion pixels will fire.
Install the Predflow Shopify app: Before you add any platform pixels, connect Predflow on the Shopify App Store. This creates a clean baseline of your actual order data - revenue, AOV, new vs returning customers, that you'll use later to reconcile against what Meta and Google report.
Set up Shopify Markets and currency correctly: If you sell in multiple regions, ensure your Shopify Markets settings are configured before adding tracking. Mismatched currencies are a silent killer of attribution accuracy that most guides skip entirely.
Step 2: Set Up Meta Pixel and Conversions API
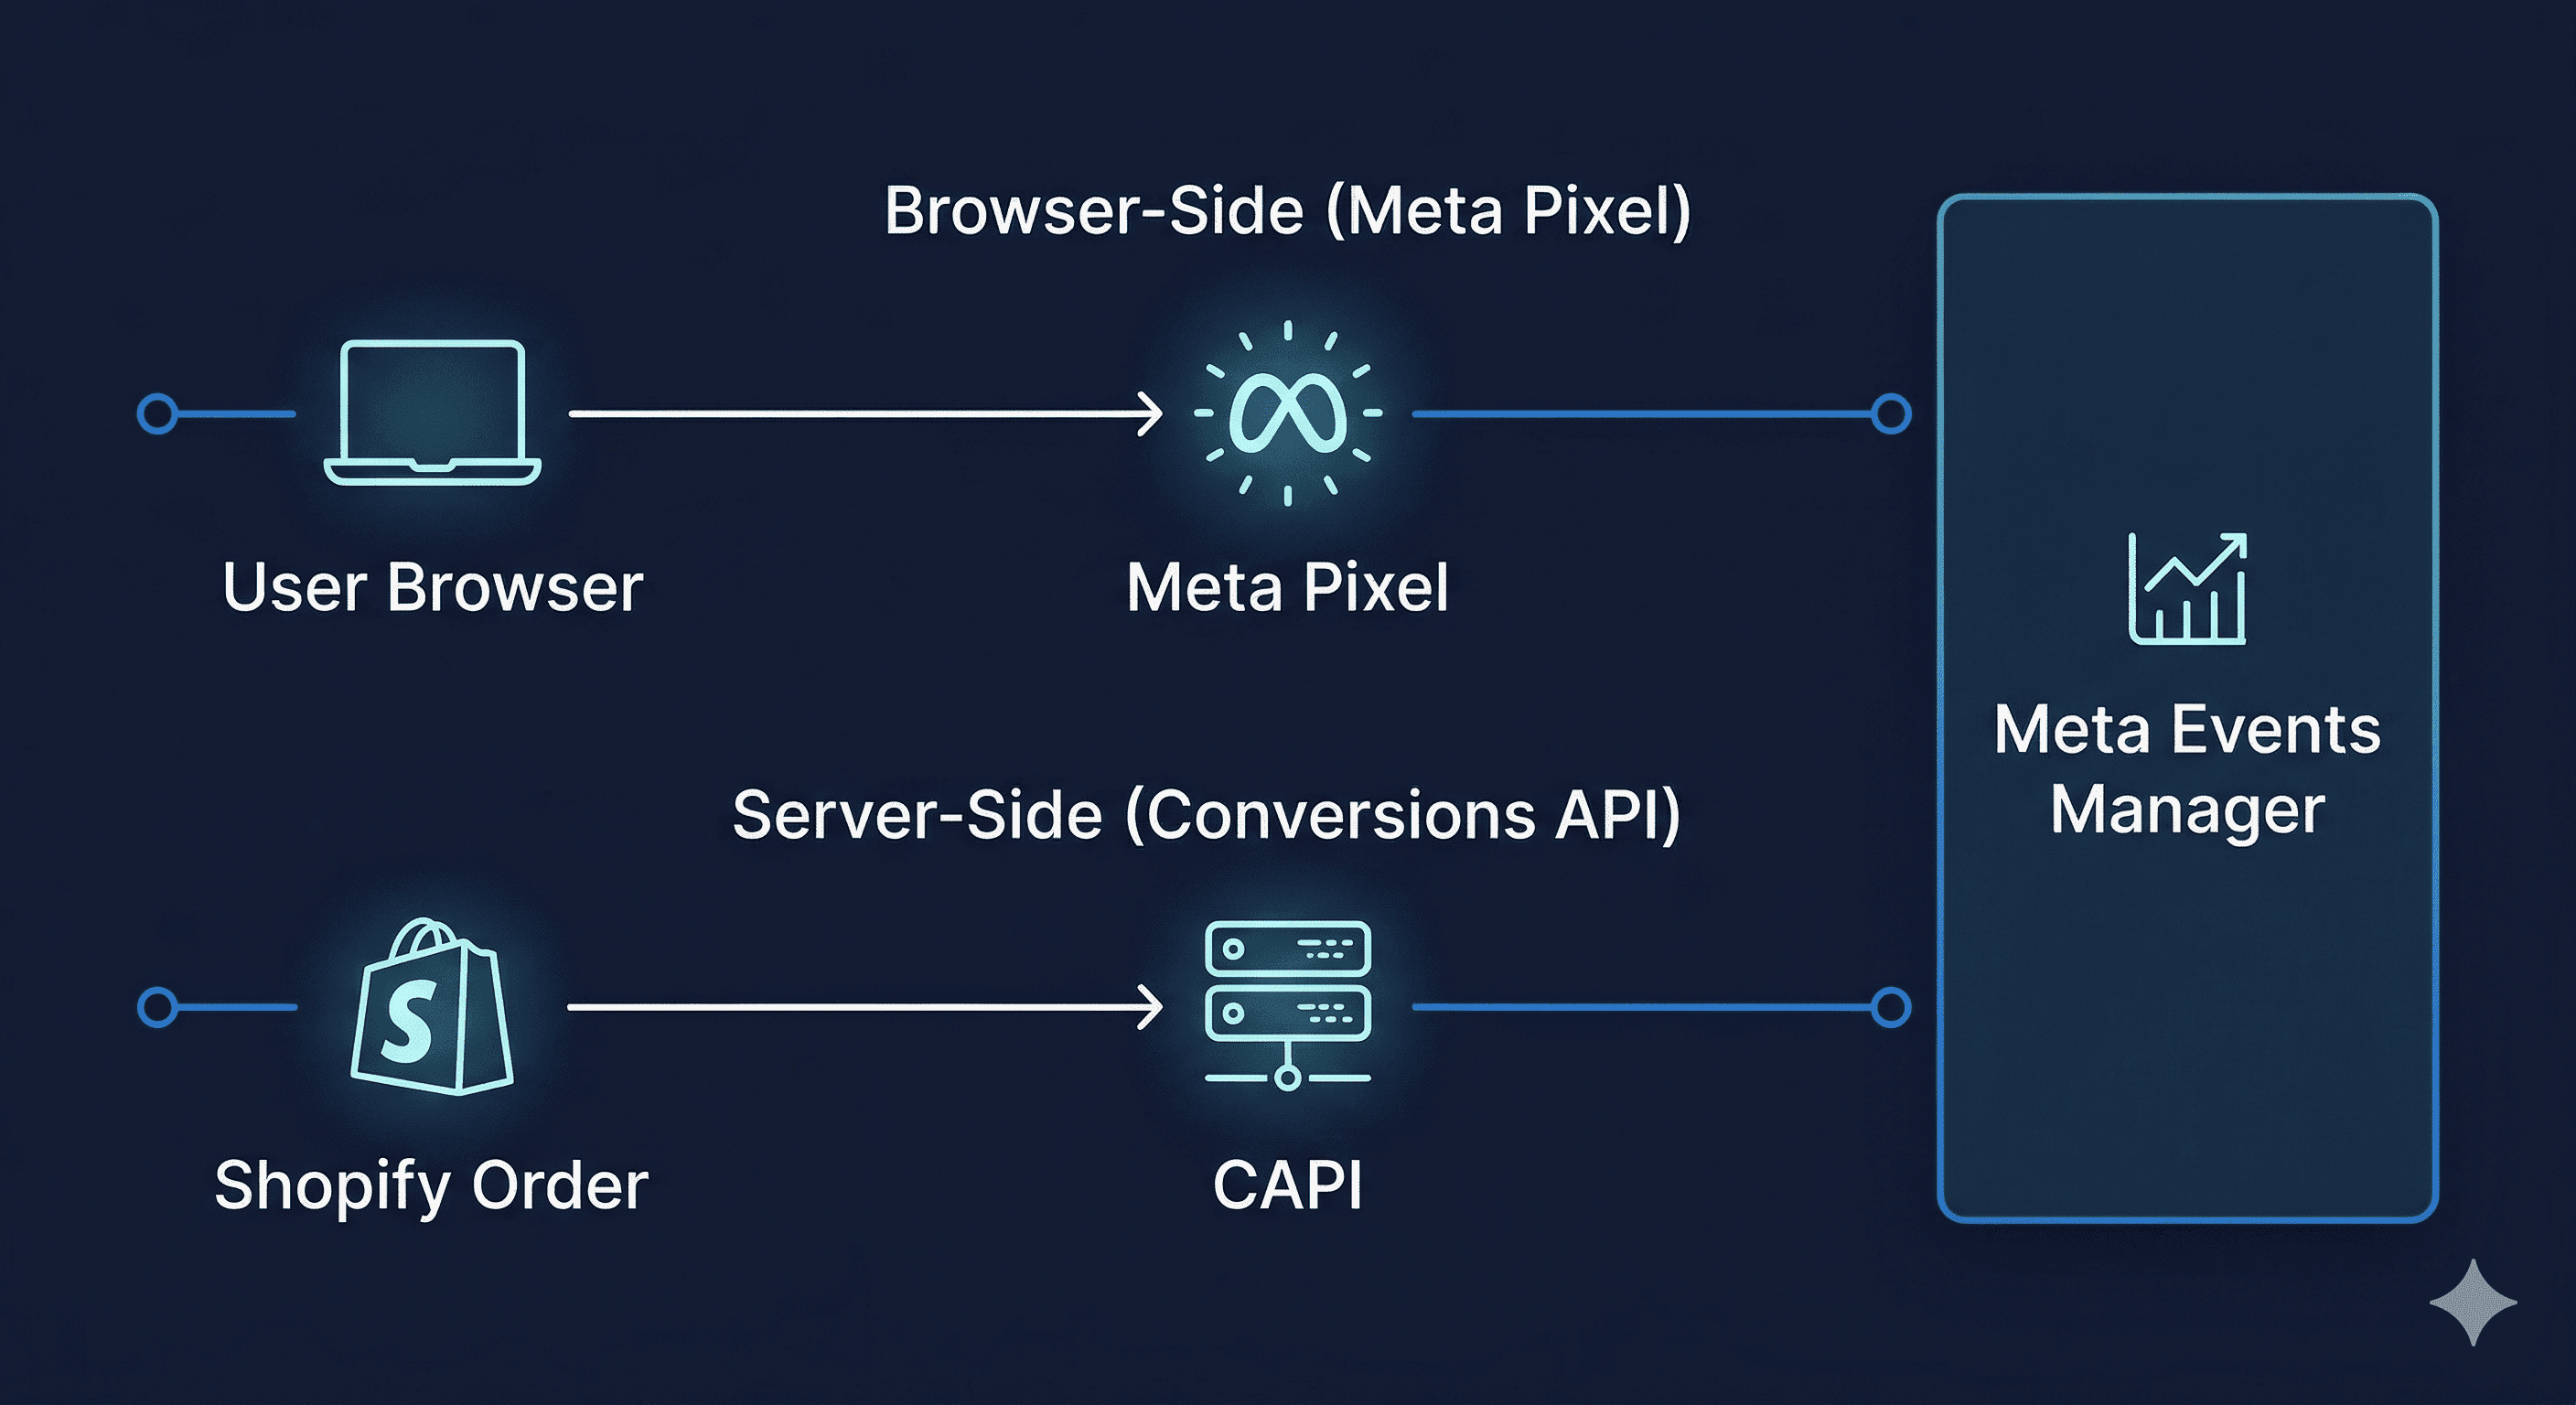
The Meta Pixel alone is no longer sufficient. iOS 14+ changes significantly reduced browser-side tracking accuracy. You need both the Pixel and the Conversions API (CAPI) running in parallel.
Install the Meta Pixel via Shopify: In your Shopify Admin, go to Marketing > Facebook & Instagram. Connect your Facebook Business Manager account. Shopify will automatically inject the Pixel on all pages, product pages, cart, checkout, and the Order Confirmation page.
Verify the Pixel is firing correctly: Install the Meta Pixel Helper Chrome extension. Visit your store, add a product to cart, and complete a test purchase. You should see the following events firing in sequence: PageView → ViewContent → AddToCart → InitiateCheckout → Purchase. If any of these are missing, your funnel data will be incomplete.
Enable the Conversions API: Inside your Facebook Business Manager, go to Events Manager > Your Pixel > Settings > Conversions API. Shopify has a native CAPI integration, enable it under Marketing > Facebook & Instagram > Data sharing settings and set it to Maximum data sharing.
Set up Aggregated Event Measurement: In Events Manager, go to Aggregated Event Measurement > Configure Web Events. Rank your events in priority order: 1. Purchase, 2. InitiateCheckout, 3. AddToCart, 4. ViewContent.
Step 3: Set Up Google Ads Conversion Tracking
Google Ads uses a different mechanism, Google Tags, and has its own enhanced conversions feature that mirrors Meta's CAPI.
Create a conversion action in Google Ads: In Google Ads, go to Goals > Conversions > + New conversion action. Select Website. Choose Purchase as the category. Set the value to "Use different values for each conversion" and set Count to One, this prevents Google from counting multiple page refreshes as multiple conversions.
Install Google Tag via Shopify: In Shopify, go to Settings > Customer events > Add custom pixel. Paste your Google Tag (format: AW-XXXXXXXXX). This injects the tag across your entire store.
Enable Enhanced Conversions: In Google Ads, go to Goals > Conversions > Enhanced conversions for web. Turn it on. This hashes and sends first-party data (email, phone) from your Checkout page back to Google, significantly improving match rates for cookieless browsers.
Step 4: Verify Your Setup With a Test Purchase
Don't skip this. Every tracking setup has at least one silent failure until you test it.
Use a discount code to place a real test order on your store. Then check: Meta Events Manager, does a Purchase event appear within 20 minutes? Google Ads — does your test purchase show up in Conversions? Shopify Orders, does the order appear with the right revenue? UTM Parameters, does the Order source show the correct source/medium from your ad?
If the Shopify order shows up but the platform doesn't register the conversion, your Pixel or Tag isn't firing on the Order Confirmation page. This is the single most common tracking failure point.
Step 5: Set Up UTM Parameters Consistently
Pixels track events. UTMs track source. You need both.
Every ad URL should have UTMs appended - utm_source, utm_medium, utm_campaign, utm_content, and utm_term. Be consistent with naming conventions. If one campaign uses utm_source=meta and another uses utm_source=facebook, you'll have fragmented data in Shopify that's impossible to reconcile.
Step 6: Reconcile Platform Data Against Actual Revenue
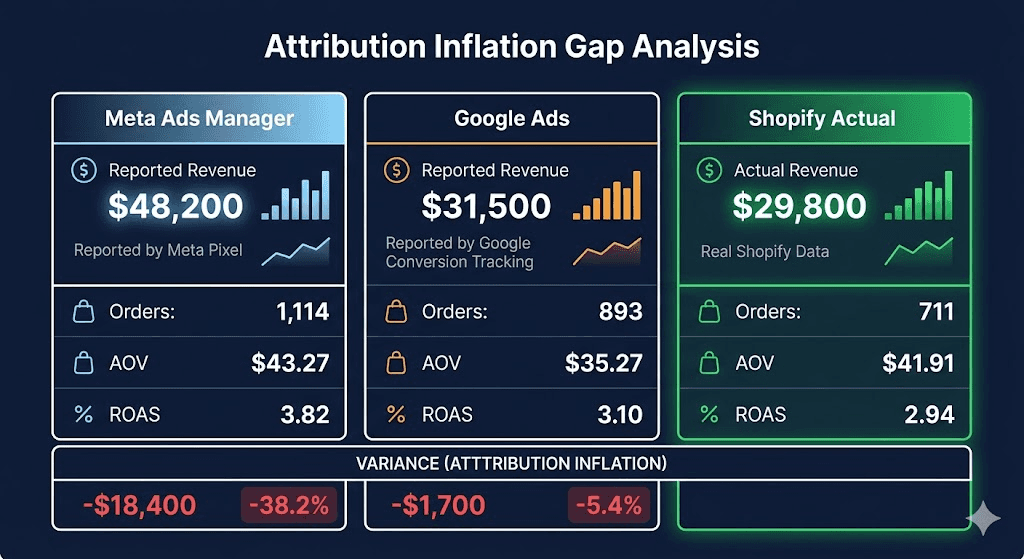
This is the step most guides don't include and it's the most important one.
Once your tracking is live and running for at least seven days, compare: Meta reported purchase revenue, Google Ads reported conversion value, and Shopify actual revenue. They will not match. The gap between platform-reported and Shopify-actual revenue is your attribution inflation, how much each platform is over-claiming.
Understanding this gap is what separates performance marketers who make good budget decisions from ones who scale losing campaigns. A platform-level ad intelligence tool can make this reconciliation automatic, rather than manually pulling reports from three dashboards every week and doing the math in a spreadsheet.
What Good Conversion Tracking Actually Enables
Accurate conversion tracking isn't about compliance or reporting hygiene. It's about being able to trust your decisions.
When your data is clean, you can answer the questions that matter: which channel actually drove the sale, which creative moved revenue vs just clicks, and where to put next month's budget. Setting up tracking correctly once - Pixel + CAPI on Meta, Enhanced Conversions on Google, and a reconciliation layer on top, means you stop making decisions based on numbers that flatter the platforms and start making decisions based on what actually happened. If you want automated anomaly detection on top of that clean data, catching drops before they become expensive, that's where the real leverage is.
Improve Ad performance with Predflow
Diagnose performance drops, creative fatigue, and attribution shifts


